Super-Green Swiss Chard Salad

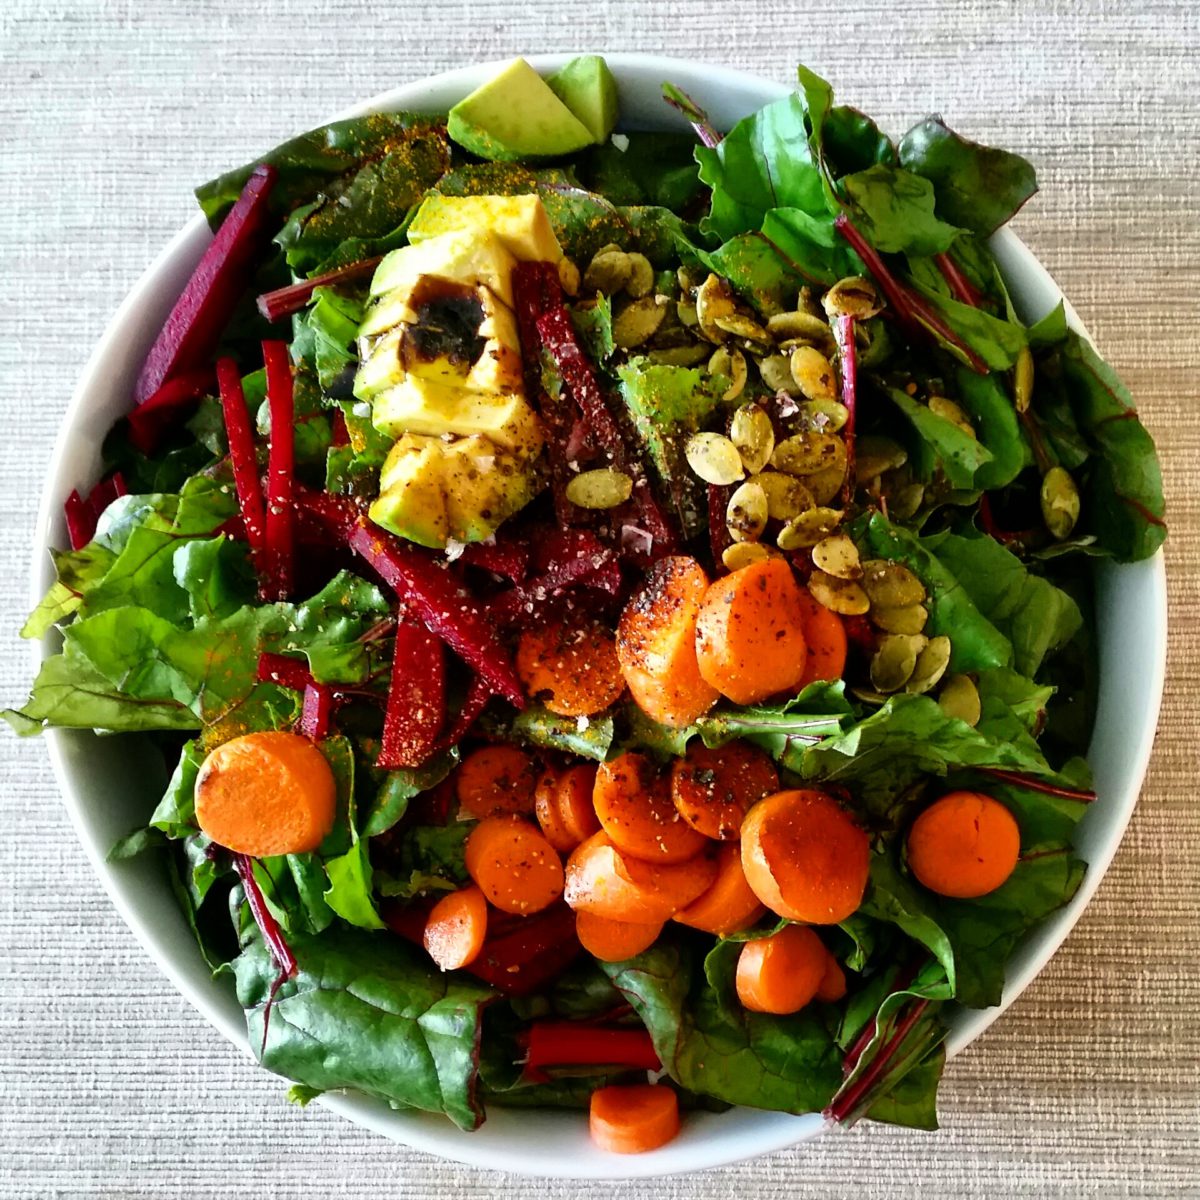
High quantity, high quality, and absolutely nourishing!

Packed with antioxidants, this salad is a good way to pack in your greens. Leafy greens such as swiss chard are awesome because they are so low in calorie and high in antioxidants. You can truly eat as much as you want! I also added some beet greens as well. More often than not, people toss the green and just use the beet. But the beet greens are absolutely edible!

Along with the greens, I added some raw beet. It adds a great taste, crunch and color! Along with adding taste to the salad, it’s full of betalains (a great antioxidant). Betalains may help protect against certain oxidative stressors in the body (anti-aging).

I always love carrots in my salad, great for vitamin A and C!

Avocado adds great taste and texture, along with some healthy fats to give your skin and hair a healthy glow!

Pumpkin seeds add a nice crunch as well as some nourishing zinc and a little protein.

I topped off the salad with a mixture of balsamic vinaigrette, Udo’s oil, and a little bit of apple cider vinegar. As well as some salt and pepper.

( I love Udo’s Oil because it is such a great mixture of healthy omega-3,6, and 9;s! )

* As a side note, check out the ANDI Guide –> ANDI Guide

Its a pretty straight forward guide that “rates” produce based on its nutrient density.

IMG_20150721_123620

Super-Green Swiss Chard Salad

  • 3 1-foot long swiss chard leaves
  • 3 beet-green stems (with leaves)
  • 1 carrot
  • 1/4 cup pumpkin seeds
  • 1 small beet
  • 1/4 avocado

Dressing:

  • 1 tbsp Udo’s Oil
  • 1 tbsp balsamic vinaigrette reduction (balsamic vinaigrette would work too)
  • 1 tsp apple cider vinegar

Chop the swiss chard leaves into bite sized pieces. Break the leaves off of the beet-green stems. Add to bowl. Chop carrot into 1/4 inch slices. Julianne the beet, or slice into small slivers. Slice avocado into 1/4 inch pieces. Add carrot, beet, and avocado into bowl. Add dressing. Cut with fork and knife until all components are well incorporated. Salt and Pepper to taste.

Enjoy! 🙂

DIY Cold Brew Coffee

Cold Brew is all the rage now. Popping up everywhere in local coffee shops and at your Starbucks. As a customer it seems that you’re dishing out a few extra dollars for this special brew. Well, it doesn’t have to be that way. You can absolutely do it yourself in any quantity. It’s a win-win situation. Save little cash and no more watered down nonsense.

So how is it done? Well, it takes about 12 hours to fully brew, so it may be best to do it overnight. I only wanted 1 cup of coffee for the morning. However, it is easily adjusted to fit any need. So, you will need a coffee filter, your favorite coffee, 1 pitcher (or what ever size container you wish to fill with coffee- make sure it is easily pourable), and water.

Fill your container with water. Then add the amount of coffee you wish to make into the water directly. The amount of coffee you  add, should equate to however strong you would like your coffee. If you like to normally brew a strong pot of coffee, add the equivalent to the pitcher of water.

I like my coffee strong, so I added 2 heaping tbsp of espresso grind into my mason jar.

IMG_20150716_094039

Let it sit overnight (or 12 hours) at room temperature or in the refrigerator.

Then, carefully pour coffee through coffee filter into another container.

There you have it. Your very own cold brew. Mix with your favorite milk or sweetener 🙂

Maybe even some maple syrup!

Enjoy!

IMG_20150716_093937IMG_20150716_094250

* Some of my favorite coffee’s are from Simpson and Vail (Check them out! http://www.svtea.com ) and Illy (www.illy.com) Coffee so rich and flavorful, it’ll put flavored creamers to shame. 😉

Vegan Brownies

Today’s post is all about these Vegan Brownies! Adapted from Jamie Oliver’s website, I made mine with walnuts and a few extra chocolate chips. Honestly, I think these brownies are better than “regular brownies” and they suit anyone who is dairy-free and super easy to make gluten-free!

If you do not have gluten-free self rising flour, that’s ok! If you ever need to make self-rising flour, the ratio is 1 cup all-purpose flour + 1 1/2 tsp baking powder  and 1/2 tsp salt.  Since this recipe only takes 3/4 cup flour, tsp of baking powder should suffice.

So here’s the recipe! I’ll bold the ingredients that I changed.

IMG_20150714_091916

Vegan Brownies!

  • 5 Tbsp Sunflower Oil  ( + extra for greasing pan)
  • 1 cup dairy-free dark chocolate
  • 3/4 cup gluten-free all purpose flour ( + 1 tbsp of baking powder and pinch of salt) 
  • 3 Tbsp cocoa powder
  • 1/2 cup of maple syrup
  • 1 tsp ground vanilla
  • 1 cup of unsweetened almond milk
  • 2/3 cup walnuts
  • 2/3 cup dairy-free chocolate chips

Preheat oven to 350F and grease a 9×9 pan with a little sunflower oil.

Melt dairy-free dark chocolate in microwave in heat-proof bowl at 30-second intervals, stirring in-between intervals (Be careful! chocolate can easily burn in microwave).

Mix gluten-free flour mixture, cocoa powder together. Sieve if possible, if not, mix with a whisk until mostly clump free. Mix in maple syrup. Then add ground vanilla and almond milk. Add the sunflower oil and melted chocolate and stir until well-combined.

Pour into greased pan and then add walnuts and chocolate chips to make sure they are evenly distributed.

Put into oven for 20-25 minutes.

Add extra chocolate chips and walnuts on top after removed from oven. 🙂

Enjoy!

If you would like to see Jamie Oliver’s recipe –> http://www.jamieoliver.com/recipes/chocolate-recipes/vegan-chocolate-brownies/#JBBpteuSdFXrR1Q8.97

Power-Up Pumpkin and Goji Oatmeal

I love breakfast! Being one of the most important meals of the day, there is no excuse to skimp. This oatmeal is tasty and can be made fairly quickly for those without a lot of morning time.

Tasty and nourishing is what is key.

I made mine with a blend of gluten-free rolled oats and steel cut oat groats. Full of nourishing fiber to keep you fuller longer!.

Sweetened with a tad maple syrup, full of antioxidants compared to regular sugar and is a low-glycemic sweetener ! Mixed with some unsweetened vanilla almond milk to give a little extra flavor.

I spiced it up with cinnamon, which is good for the metabolism, and tasty nutmeg. Topped with pumpkin seeds which are full of nourishing zinc (great for the skin!), and goji berries-teeming with antioxidants, and a few hemp seeds, which are an awesome source of omega-3’s.

IMG_20150715_093305

Pumpkin and Goji Oatmeal

  • 1/2 cup gluten free rolled oats
  • 1/4 cup steel cut oat groats
  • 1/2 cup unsweetened vanilla almond milk (plus more for cooling the oatmeal)
  • 1 tbsp maple syrup
  • 1/2 tbsp cinnamon
  • dash of nutmeg
  • 1/2 small banana
  • 1/4 cup raw pumpkin seeds
  • 2 tbsp goji berries
  • 1 tbsp hemp seeds

Mix rolled oats and steel cut oat groats together. Add vanilla almond milk. Microwave for 3 minutes. Make sure to watch to microwave to make sure the oatmeal doesn’t over flow.

Add maple syrup, cinnamon, and nutmeg. Stir until combined. Add extra almond milk until desired consistency.

Slice banana into small “banana coins” and add to oatmeal. Add pumpkin seeds, goji berries, and hemp seeds.

Enjoy!

Homemade Cinnamon Maple Granola

Nothing beats homemade granola! Not only is it super easy to make, it is super customizable. When you make it yourself, you know exactly what is going into it! ( can’t always say the same for the store bought brands. )

So why would this granola make a tasty and healthy snack?

Well, the oats are already packed with fiber (they’re 100% whole grain!) , I added pumpkin seeds which contain nourishing zinc. Walnuts are full of omega-3’s. Figs, which are full of fiber and also contain calcium. Dates, for their sweetness and their surprising source of iron.

Coconut oil has the wonderful vitamins A and C, along with calcium and iron. I sweetened the granola with Madava Farm’s Crown Maple Syrup. Crown Maple Syrup is truly something special, along with its wonderful taste, its simply bursting with vitamins and minerals compared to other sweeteners. Maple syrup is full of antioxidants and is a low-glycemic sweetener! ( check it out! https://www.crownmaple.com/about-crown-maple/maple-nutrition )

As far as spices go, I added cinnamon which is wonderful for the metabolism. nutmeg , and a hint of allspice.

So, here’s the recipe!

IMG_20150715_084339

Cinnamon Maple Granola

  • 2 1/2 cups Gluten Free Rolled Oats
  • 2 tbsp coconut oil
  • 1/2 cup raw pumpkin seeds
  • 1/2 cup walnuts
  • 4 dried figs
  • 3 dried dates
  • 1/2 cup maple syrup
  • 1 tsp ground vanilla
  • 1 tbsp cinnamon
  • 1/2 tsp nutmeg
  • 1 dash of allspice

Set oven to 250F. Dice figs and dates.

in a large bowl, mix rolled oats and coconut oil until fully covered. Add maple syrup. Then add pumpkin seeds, dates, walnuts, and figs. Then mix in the maple syrup. Add the ground vanilla, cinnamon, nutmeg, and allspice. Only a very small amount of allspice is needed, for it is a very strong spice.

Once everything is coated, spread evenly onto a nonstick baking sheet and bake for 25 minutes. Stir. Then bake for another 20 minutes.

IMG_20150715_093006

Enjoy! 🙂

Healthy “Butter” Popcorn

Grocery stores are now stocked with plenty of healthy popcorns popped with coconut oil, kale, chia, what have you.. Most of them are healthy and quite tasty! But also pretty expensive… Well, popcorn doesn’t have to be expensive to be healthy! Its super easy to make your own, and make it however you’d like. You just have to be equipped with the right tools.

This popcorn I made with coconut oil, Udo’s oil, nutritional yeast, and a little salt and pepper.

This popcorn is vegan, dairy-free, and gluten-free ! The Udo’s oil gives it a nice buttery taste and the nutritional yeast gives it a yummy cheesy taste. (think cheesy as in Smart-Food popcorn, not American cheese).

Popcorn itself is an awesome snack for its low-calorie, high fiber, and a whole-grain! Being so healthy by itself, lends a great opportunity to make it “super-healthy” with what you top it with.

Udo’s oil is full of healthy omega-3, 6, and 9’s ! Awesome fats that are good for your skin, full of anti-inflammatory properties, as well as great antioxidants.

Nutritional yeast is popular especially with vegans, for it gives a nice “cheesy” flavor to things. Whats awesome out this food is that it is a complete protein! Its a good source of fiber, as well as B-vitamins. Sometimes it is fortified with B-12 which is important for those who live a dairy and meat-free life.

IMG_20150714_094855

So here’s the recipe:

DIY Healthy Popcorn

  • 1/2 Tbsp coconut oil
  • 1/4 cup popcorn kernels
  • 1 tbsp Udo’s Oil
  • 3 shakes of Bragg’s Nutritional Yeast
  • Salt
  • Pepper

Put coconut oil and kernels into a sauce pan and cover. Turn to medium heat. Shake pan every few minutes to prevent popcorn from burning.

Pop until popcorn “pops” are 1 to 2 seconds apart. Then remove from heat.

Dress with Udo’s oil, nutritional yeast, and a sprinkle of salt and pepper.

You can adjust the ratios to fit your tastebuds.

Enjoy 🙂

*DO NOT pop with Udo’s oil. Udo’s oil is not heat stable and is only to be used for dressing purposes.

Oatmeal Raisin Cookies

Since it’s been so rainy and stormy these past few days, I decided to brighten things up with some tasty oatmeal raisin cookies! So I adapted this Oatmeal Raisin Cookie recipe from the “Essentials of Healthful Cooking” cookbook by Williams-Sonoma, but I did make a few of my own additions and substitutions. I will bold the substitutions when I post the recipe below.

I personally love oatmeal raisin cookies, and they hold some healthy properties as well! Oats are known for their fiber and are hold a higher amount of protein than other grains. They are also a good source of riboflavin, thiamin, and vitamin E. I added pumpkin seeds as well as walnuts to some of my cookies for an extra crunch and flavor! Walnuts are a good source of omega-3 fatty acids that fuel a healthy heart and a healthy brain. I added pumpkin seeds simply because I love the taste! But they do offer some of the additional nutrients of vitamin E and zinc.

IMG_20150709_095607

So, here’s the recipe!

Oatmeal Raisin Cookies

  • 2 1/2 cups of quick cooking rolled oats ( I used gluten-free )
  • 1 cup unbleached all-purpose flour (I used gluten-free)
  • 1/2 tsp baking powder
  • 1/2 tsp baking soda
  •  2 tsp cinnamon
  • 1/8 tsp allspice
  • pinch of salt
  • 3 Tbsp unsalted butter (at room temp.)
  • 2 Tbsp coconut oil
  • 2/3 cup maple syrup
  • 1 large egg white
  • 1/3 cup apple butter
  • 1 tsp ground vanilla
  • 2/3 cup raisins
  • 1/3 cup pumpkin seeds (sprouted)
  • 1/4 cup chopped walnuts

Line 2 baking sheets with parchment paper. Set the oven racks in the upper 1/3 of the oven and the lower 1/3 of the oven. Set the oven to 325F ( when swapping maple syrup for brown sugar, you usually lower the oven temperature by about 25 F).

In a bowl, mix the oats, flour, baking powder, baking soda, cinnamon, allspice, and salt until well incorporated. In a separate bowl mix butter and coconut oil until well blended. Then mix in maple syrup and stir for about 1-2 minutes. Then incorporate the egg white, apple butter, vanilla. Then mix your dry ingredients with the wet ingredients. Right before a sticky dough forms, mix in the raisins, pumpkin seeds, and walnuts.

On parchment paper, drop dough about the size of a tablespoon, 2 inches apart. If you would like flatter cookies, gently press down on each drop of dough.

Bake cookies for about 7 minutes, then rotate 180 degrees, switch positions between the racks, and bake for an additional 7 minutes.

There you have it! Enjoy your cookies. 🙂

IMG_20150709_092306

*Recipe adapted from Essentials of Healthful Cooking by Williams-Sonoma

How To Become a Runner

Running hasn’t always brought comfort. In fact, it used to rank highly in the “Top 5 Childhood Anxieties” list.  Starting in Middle School, “The Mile” was one of the top causes of sleepless nights and sudden attempts to feign an illness. The dreaded 10 laps around the Middle School Soccer Field seemed to last hours and everyone seemed to be exponentially faster than I was.

It wasn’t until college when I started to give running a second chance. I realized that I could make it mine. I could go as slow as I wanted, stop as often as I needed. It wasn’t a race, but a place where I could just clear my head. Every run could be my run. There was no teacher standing over me with a stop watch, no kid sprinting past me while I trudged along.

I wanted to become a better runner, but I didn’t know how to go about it.  At the club involvement fair, I came across UCONN Endurance, a club where we “run for fun.” Joining a running group like Endurance opened so many doors. I was able to gain some advice from more seasoned runners, hear about some of the best races to run, and most importantly I made some of my best friends.( They were the ones to talk me into running my first half marathon. )

Joining a running group- or any type of fitness group- can help you commit to your goal.

Training for my first half marathon meant carving out at least an hour of my time while at school. Between classes and homework, I was able to find the morning was the best time to get my runs in. In fact, my most favorite time of day suddenly became the morning. I found myself waking up just before the sun in order to treat myself to a sunrise. It became my happy place. My quiet place.

Screenshot_2015-07-06-15-12-43

Running then became so much more to me. It was no just an exercise. It was my time to forget about any exams, projects, relationships, future career options. I was born a worrier, but running granted me a clear mind.

When you want to commit to something new, like working out or eating healthier, you must make sure you are doing it for you. That deep down you want to do this. If it is truly for your own benefit, make sure you have a justifiable and healthy reason behind it. Remember why you started and tune into the feelings of accomplishment. Whether it be running 5 minutes longer than last time, waking up feeling more refreshed, or creating a new delicious meal. Change takes time, but being able to cherish those feelings of achievement will give you the energy to keep going.

Creamy Vegan Ice Cream

Hi Everyone!

With it being summertime, I wanted to share with you a dairy-free creamy creation that is sure to top any almond milk or coconut milk “ice cream” you may have. Sometimes it’s hard to find a yummy dairy free substitute for ice cream without the grocery list of fillers and artificial additives. Well, I have a solution that is only 5 ingredients. AND it is super creamy.

Chocolate Chocolate Chip Vegan Ice Cream.

IMG_20150703_141836

It’s made with avocado, coconut, cacao, cacao nibs, and a hint of maple syrup.  I know avocado might sound a little weird, but with the cacao powder you can’t even taste it!

So, not only is this ice cream healthy, filler-free, and dairy-free, it’s a super tasty and guilt-free snack!

Avocado~ A great source of biotin (hello pretty hair and nails!) as well as monounsaturated fats that help keep skin moisturized. Even though avocados are higher in fat, they’re a “good” fat that can help slow the release of glucose into your system, therefore requiring less insulin ( a fat storage hormone).

Cacao~ talk about antioxidants! A pure form of chocolate and a healthy choice too! Cacao is also a good source of Magnesium, known as the “mineral of beauty” in Traditional Chinese Medicine.

Coconut~ Coconut itself has been in debate lately about it’s saturated fat content. There have been studies that show that the saturated fat particular to coconuts is digested more like a carbohydrate than saturated fat that is found in some animal-based food products. Besides that, coconut’s are still full of Vitamin A, Vitamin C, Calcium, Iron, and Lauric Acid! (What’s pretty cool about Lauric acid is that is has been shown to have strong antibacterial properties, some studies even show that it is stronger than Benzoyl Peroxide! ( one ingredient typically found in face washes)

Maple Syrup~ One of my favorite sweeteners. Not only does it have a range of minerals and antioxidants, it also contains oligosaccharides ( promote healthy gut bacteria!) But, what is really awesome about maple syrup is how it has been shown to act differently in the body as opposed to regular table sugar. Maple syrup contains natural phenols which in some studies has shown to help regulate blood sugar. ( say no to that blood sugar spike ! )  (:

So, here’s the recipe!

Chocolate Chocolate Chip Vegan Ice Cream

  • 1 Avocado
  • 1/4 Cup Coconut Manna ( or flesh of 1 young coconut)
  • 4 Tablespoons of Cacao Powder
  • 2 Tablespoons Maple Syrup
  • 1/8 Cup Cacao Nibs ( or more as you please)

Warm the coconut manna just until it has turned to liquid. Then add the avocado, coconut manna, cacao powder and maple syrup to a blender. Blend for about 1 minute, scrap the sides, then blend for about 1 minute. Scoop into bowl, add the cacao nibs, and then freeze for about 1 hour. Feel free to add your own variations such as nuts, vanilla, or fruit!

Enjoy! (:

( Background on ingredients from Dr. Libby’s “Beauty From the Inside Out” and “Sweet Food Story”)